Setting up a CMake project in Windows using Visual Studio Code
This post will guide you through setting up a CMake project in Windows using Visual Studio Code. The goal is so that in the end, you can build and run a C/C++ project with CMake in Visual Studio Code without the need of a full IDE. You will also learn how to manage libraries and dependencies with vcpkg.
What is CMake?
CMake is an open-source, cross-platform build system generator. It is used to manage the build process of software projects in a compiler-independent manner. CMake generates native build files for your platform, such as Makefiles for Unix systems and Visual Studio project files for Windows systems.
Why use CMake?
CMake is a powerful tool that simplifies the build process of your project. It allows you to define your build process in a single configuration file (CMakeLists.txt) and generate the necessary build files for your platform. This makes it easier to manage your project’s dependencies, build options, and target platforms. The CMakeLists.txt file is platform-independent, which means you can use the same file to generate build files for different platforms.
Here’s a simple diagram that shows how CMake works: 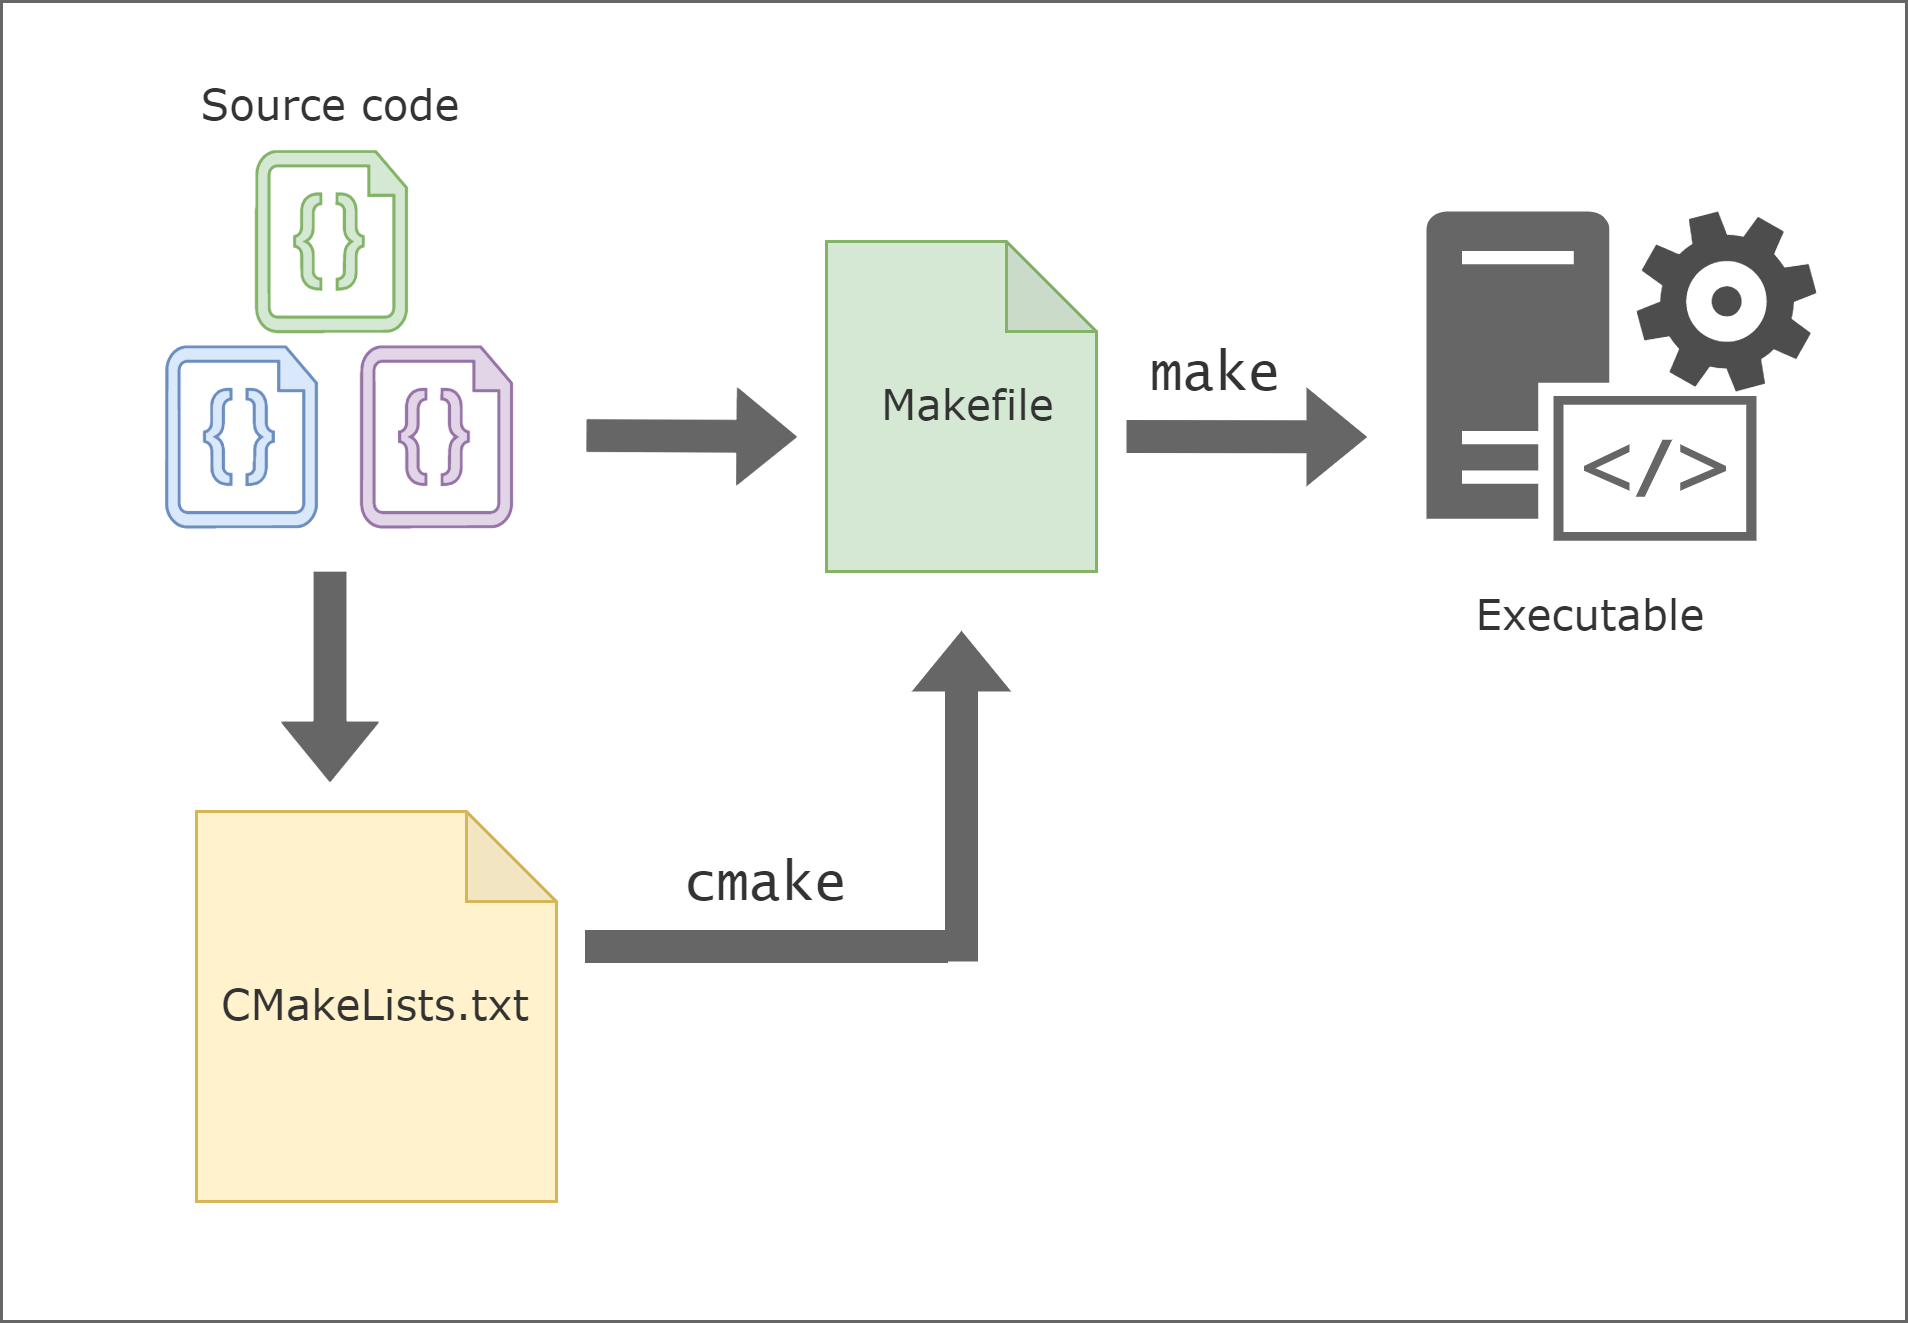
You have your source code and a CMakeLists.txt file. You run CMake to generate the build files for your platform. Then you use the build files to compile and link your source code into an executable. In the above example, CMake generates Makefiles for Unix systems.
What build system to use under Windows?
Now, as we said before, CMake is a build system generator, not a build system itself. This means that CMake generates build files for a specific build system that will actually compile and link your source code.
There are several build systems available for Windows, such as Make, Meson… In this post, we will use Ninja.
What is Ninja?
Ninja is a small build system with a focus on speed. It differs from other build systems in two major respects: it is designed to have its input files generated by a higher-level build system, and it is designed to run builds as fast as possible.
Now why would we choose Ninja over the other build systems? Well, I love 🥷 . I don’t need to give more arguments and you are not here for this. The differences between build systems are noticeable when the projects is quite large. For your personnals projects any of the build systems will feat your needs.
Here’s an overview of the build.ninja file generated by CMake:
# CMAKE generated file: DO NOT EDIT!
# Generated by "Ninja" Generator, CMake Version 3.28

# This file contains all the build statements describing the
# compilation DAG.

# =============================================================================
# Write statements declared in CMakeLists.txt:
#
# Which is the root file.
# =============================================================================

# =============================================================================
# Project: hello-world
# Configurations: Release
# =============================================================================

#############################################
# Minimal version of Ninja required by this file

ninja_required_version = 1.5


#############################################
# Set configuration variable for custom commands.

CONFIGURATION = Release
# =============================================================================
# Include auxiliary files.


#############################################
# Include rules file.

include CMakeFiles\rules.ninja

# =============================================================================

#############################################
# Logical path to working directory; prefix for absolute paths.

cmake_ninja_workdir = C$:\dev\hello-world\build\
# =============================================================================
# Object build statements for EXECUTABLE target hello-world


#############################################
# Order-only phony target for hello-world

build cmake_object_order_depends_target_hello-world: phony || CMakeFiles\hello-world.dir

build CMakeFiles\hello-world.dir\main.cpp.obj: CXX_COMPILER__hello-world_unscanned_Release C$:\dev\hello-world\main.cpp || cmake_object_order_depends_target_hello-world
  FLAGS = /DWIN32 /D_WINDOWS /EHsc /O2 /Ob2 /DNDEBUG -MD
  INCLUDES = -external:IC:\dev\vcpkg\installed\x64-windows\include -external:IC:\dev\vcpkg\installed\x64-windows\include\SDL2 -external:W0
  OBJECT_DIR = CMakeFiles\hello-world.dir
  OBJECT_FILE_DIR = CMakeFiles\hello-world.dir
  TARGET_COMPILE_PDB = CMakeFiles\hello-world.dir\
  TARGET_PDB = hello-world.pdb
We can see that the build.ninja file contains all the build statements describing the compilation. This file is generated by CMake and used by Ninja to compile and link your source code into an executable.
What about dependencies?
When working on a project, you will often need to use external libraries and dependencies. Managing these dependencies can be a hassle, especially when working on multiple platforms. This is where vcpkg comes in.
What is vcpkg?
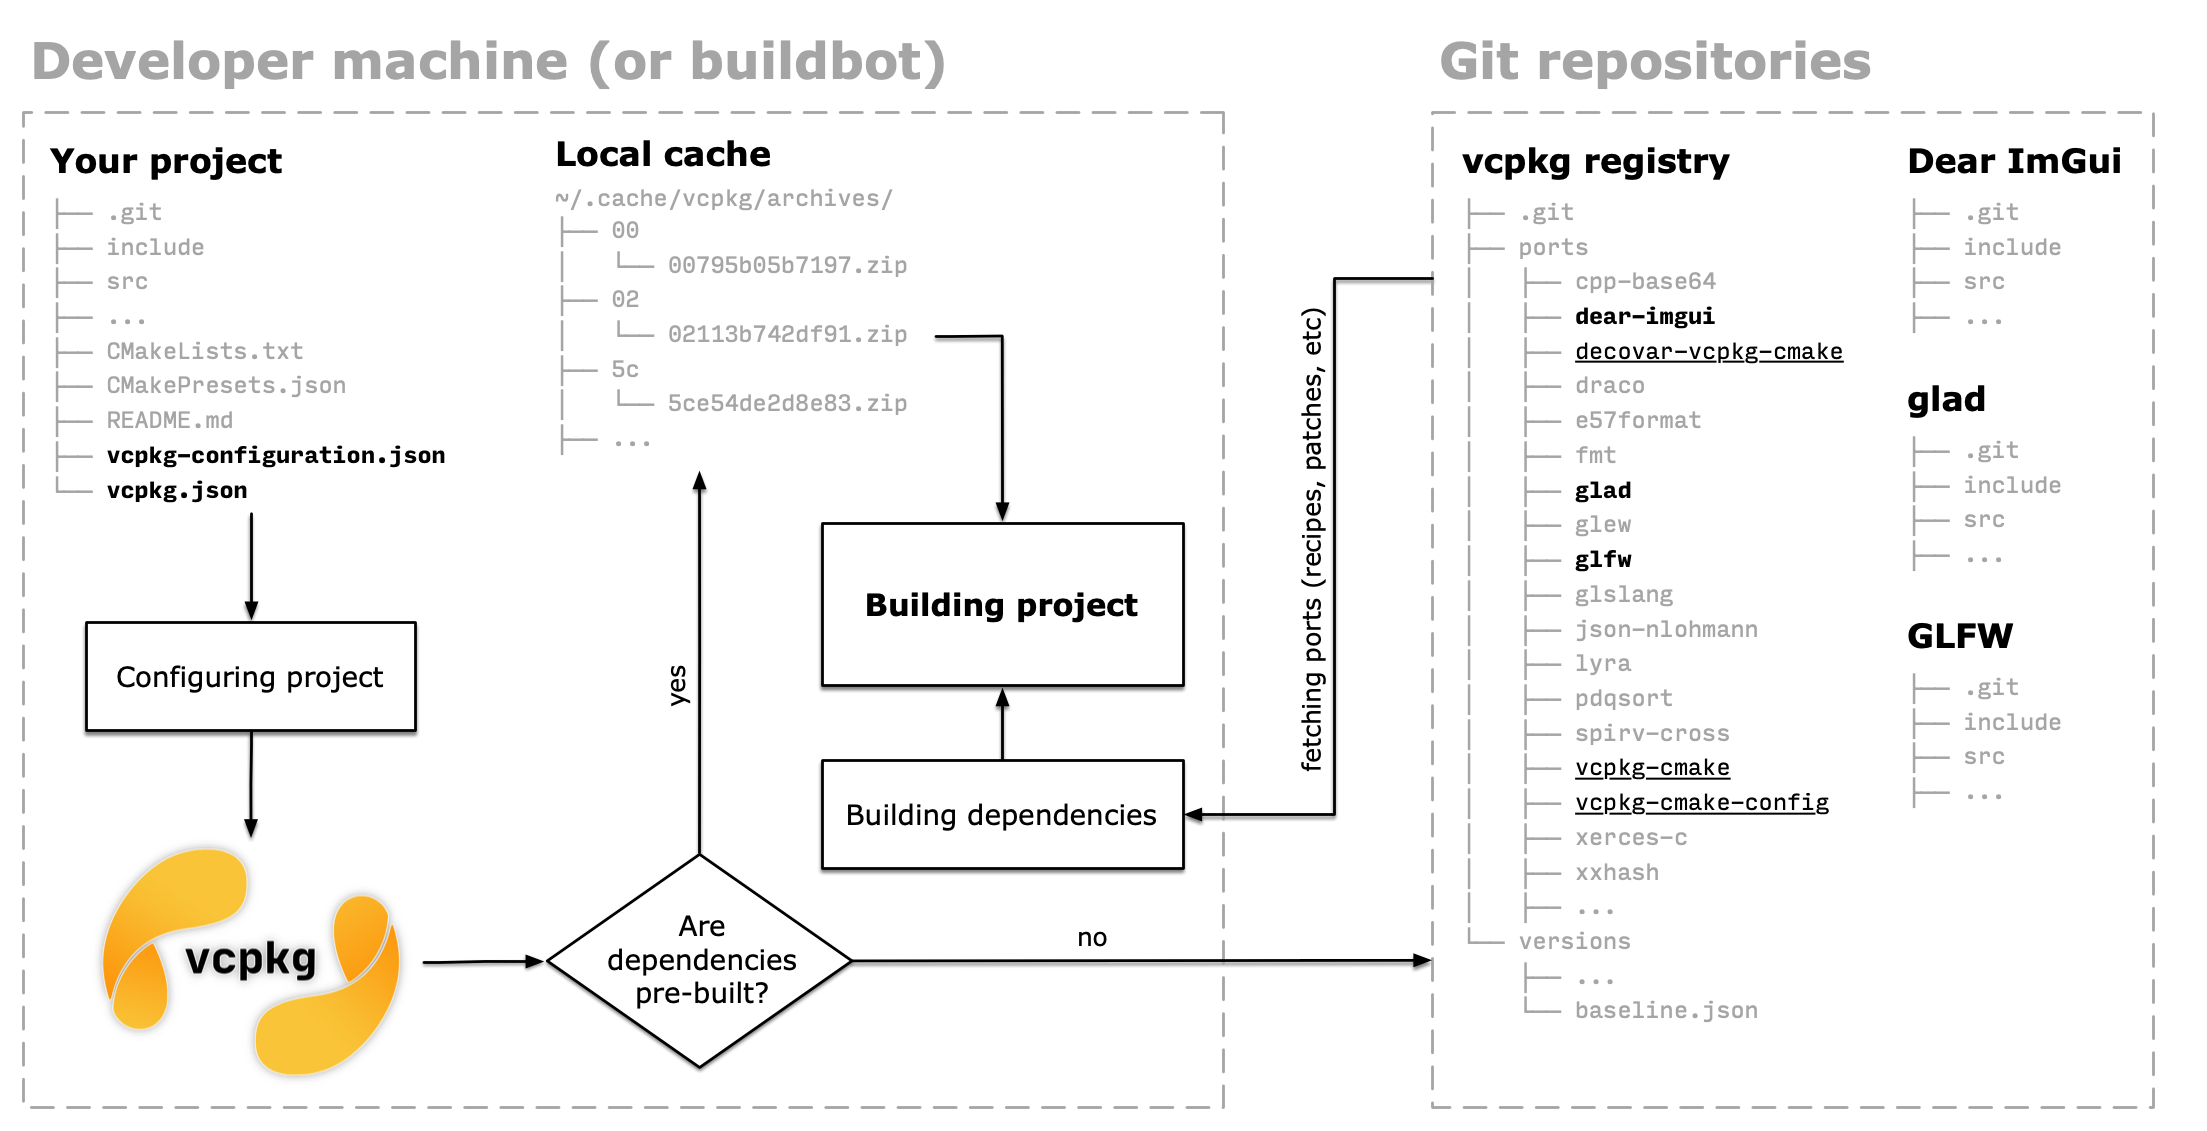
vcpkg is a cross-platform package manager for C and C++ libraries. It simplifies the process of installing and managing libraries and dependencies for your project. vcpkg provides precompiled packages for a wide range of libraries, making it easy to add new dependencies to your project.
Unlike other programming languages, C and C++ do not have a built-in package manager. This means that you have to manually download, build, and install libraries and dependencies for your project. vcpkg automates this process by providing precompiled packages for a wide range of libraries. This makes it easy to add new dependencies to your project without having to worry about building and installing them manually.
Like build systems, there are several package managers available for C and C++ libraries, such as Conan, CPM…
The most important element: the compiler
The compiler is the most important element when working with C and C++ projects. The compiler is responsible for compiling and linking your source code into an executable. Remember what is the goal :
Visual Studio without Visual Studio 🙃
So we will use the Microsoft C++ compiler. The Microsoft C++ compiler is included with Visual Studio, but you can also install it separately using the Visual Studio Build Tools. The Visual Studio Build Tools include the Microsoft C++ compiler, the Visual C++ libraries, and other tools needed to build C and C++ projects.

Make your choice
I’m starting to see a pattern, there is no standard in the C/C++ world. At the end of the day, it’s up to you to choose the tools that best fit your needs.

Joke aside, now that we have a better understanding of CMake, Ninja, and vcpkg, let’s get started by installing all the tools.
Installing the tools
CMake
First, you need to install CMake. You can download the latest version of CMake from the official website: https://cmake.org/download/. Once you have downloaded the installer, run it and follow the instructions to install CMake on your system.
Make sure to add CMake to your system PATH during the installation process. This will allow you to run CMake from the command line. The path to the binary C:\Program Files\CMake\bin.
By now you should see the following output when running cmake in your terminal.
1
2
3
4
5
6
7
8
9
10
11
12
C:\Users\user>cmake
Usage

  cmake [options] <path-to-source>
  cmake [options] <path-to-existing-build>
  cmake [options] -S <path-to-source> -B <path-to-build>

Specify a source directory to (re-)generate a build system for it in the
current working directory.  Specify an existing build directory to
re-generate its build system.

Run 'cmake --help' for more information.
Ninja
Next, you need to install Ninja. You can download the latest version of Ninja from the official github repository : https://github.com/ninja-build/ninja/releases . Once you have downloaded the binary, extract it to a directory on your system, in my case i created a dev folder in my C drive and extracted the binary there. Add the path to the Ninja binary to your system PATH. This will allow you to run Ninja from the command line.
By now you should see the following output when running ninja --help in your terminal.
1
2
3
4
5
6
7
8
9
10
11
12
13
14
15
16
17
18
19
20
21
22
C:\Users\user>ninja --help
usage: ninja [options] [targets...]

if targets are unspecified, builds the 'default' target (see manual).

options:
  --version      print ninja version ("1.11.1")
  -v, --verbose  show all command lines while building
  --quiet        don't show progress status, just command output

  -C DIR   change to DIR before doing anything else
  -f FILE  specify input build file [default=build.ninja]

  -j N     run N jobs in parallel (0 means infinity) [default=14 on this system]
  -k N     keep going until N jobs fail (0 means infinity) [default=1]
  -l N     do not start new jobs if the load average is greater than N
  -n       dry run (don't run commands but act like they succeeded)

  -d MODE  enable debugging (use '-d list' to list modes)
  -t TOOL  run a subtool (use '-t list' to list subtools)
    terminates toplevel options; further flags are passed to the tool
  -w FLAG  adjust warnings (use '-w list' to list warnings)
vcpkg
Finally, you need to install vcpkg. You can clone the vcpkg repository from the official github repository.
1
2
C:\Users\user>cd C:\dev
C:\dev>git clone https://github.com/microsoft/vcpkg.git
Now that you have cloned the vcpkg repository, navigate to the vcpkg directory and execute the bootstrap script:
1
2
C:\dev>cd vcpkg
C:\dev\vcpkg>bootstrap-vcpkg.bat
Configure the VCPKG_ROOT environment variable.
1
2
C:\dev\vcpkg>set VCPKG_ROOT=C:\dev\vcpkg
C:\dev\vcpkg>set PATH=%VCPKG_ROOT%;%PATH%
Visual Studio Build Tools
You also need to install the Visual Studio Build Tools. You can download the Visual Studio Build Tools from the official website: https://visualstudio.microsoft.com/visual-cpp-build-tools/. Once you have downloaded the installer, run it and follow the instructions to install the Visual Studio Build Tools on your system.
We need to be able to run the cl command in the terminal. To do this, we need to add the path to the Visual Studio Build Tools to the system PATH. The path to the Visual Studio Build Tools is usually something like C:\Program Files (x86)\Microsoft Visual Studio\2022\BuildTools\VC\Tools\MSVC\14.38.33130\bin\Hostx64\x64. So add this path to your system PATH.
Creating a CMake project
First create a folder for your project. In this example, I will create a folder called hello-world in my C:\dev directory.
1
2
C:\dev>mkdir hello-world
C:\dev>cd hello-world
Now create a CMakeLists.txt file in the hello-world directory. This file will define the build process for your project.
1
2
3
4
5
cmake_minimum_required(VERSION 3.20)

project(hello-world)

add_executable(hello-world main.cpp)
Next, create a main.cpp file in the hello-world directory. This file will contain the source code for your project.
1
2
3
4
5
6
#include <iostream>

int main() {
    std::cout << "Hello, World!" << std::endl;
    return 0;
}
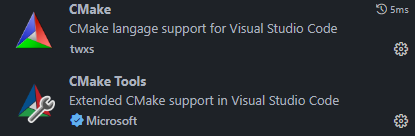
We dont want to run the CMake command by hand in order to build the project, instead, we are going to install the CMake Tools extension in Visual Studio Code. This extension provides support for CMake projects in Visual Studio Code, allowing you to configure, build, and run CMake projects directly from the editor.
After the installation you should be able to do the following inside of your Visual Studio Code.

That’s the moment where everyone is retaining their breath 😧 …
Guess what it does not work 😅. Instead you get this kind of gibberish in the terminal.
1
2
3
4
5
6
7
8
9
[main] Configuring project: hello-world
[proc] Executing command: "C:\Program Files\CMake\bin\cmake.EXE" --no-warn-unused-cli -DCMAKE_BUILD_TYPE:STRING=Debug -DCMAKE_EXPORT_COMPILE_COMMANDS:BOOL=TRUE -SC:/dev/hello-world -Bc:/dev/hello-world/build -G "Unix Makefiles"
[cmake] Not searching for unused variables given on the command line.
[cmake] CMake Error: CMake was unable to find a build program corresponding to "Unix Makefiles".  CMAKE_MAKE_PROGRAM is not set.  You probably need to select a different build tool.
[cmake] CMake Error: CMAKE_C_COMPILER not set, after EnableLanguage
[cmake] CMake Error: CMAKE_CXX_COMPILER not set, after EnableLanguage
[cmake] -- Configuring incomplete, errors occurred!
[proc] The command: "C:\Program Files\CMake\bin\cmake.EXE" --no-warn-unused-cli -DCMAKE_BUILD_TYPE:STRING=Debug -DCMAKE_EXPORT_COMPILE_COMMANDS:BOOL=TRUE -SC:/dev/hello-world -Bc:/dev/hello-world/build -G "Unix Makefiles" exited with code: 1
[visual-studio] Patch Windows SDK path from C:\Program Files (x86)\Windows Kits\10\bin\x64 to C:\Program Files (x86)\Windows Kits\10\bin\10.0.22621.0\x64 for C:\Program Files (x86)\Microsoft Visual Studio\2022\BuildTools\VC\Auxiliary\Build\vcvarsall.bat
As we can see, the CMake Tools extension is trying to use Unix Makefiles as the build system, which is not supported on Windows. We need to configure CMake to use Ninja as the build system instead.
To do this, create a settings.json file in the .vscode directory. This file will define the build presets for your project.
1
2
3
4
5
6
7
8
9
10
11
{
    "cmake.generator": "Ninja",
    "cmake.configureOnOpen": true,
    "cmake.configureSettings": {
        "CMAKE_TOOLCHAIN_FILE": "C:/dev/vcpkg/scripts/build/systems/vcpkg.cmake",
        "VCPKG_TARGET_TRIPLET": "x64-windows",
        "CMAKE_BUILD_TYPE": "Release",
        "CMAKE_C_COMPILER": "cl.exe",
        "CMAKE_CXX_COMPILER": "cl.exe"
    },
}
Dont forget to remove the build directory before re-running the CMake Configure command. And if you have any problems make sure to clear the CMake cache even for the following steps.
Now let me explain those 2 lines in the settings.json file.
CMAKE_TOOLCHAIN_FILE: This is the path to the vcpkg toolchain file. The vcpkg toolchain file contains the configuration settings for vcpkg, such as the list of installed packages and the target platform.
VCPKG_TARGET_TRIPLET: This is the target platform for vcpkg. In this example, we are using the x64-windows target platform.
CMAKE_BUILD_TYPE: This is the build type for your project. In this example, we are using the Release build type.
For more information on the available info on vcpgk you can read the documentation here.
After this your project should be configured correctly and you should be able to build and run your project using the CMake Tools extension in Visual Studio Code. 😎

Managing dependencies with vcpkg
Now that you have a basic CMake project set up, let’s see how you can manage dependencies using vcpkg.
First, you need to install the dependencies you want to use in your project. You can search for available packages using the vcpkg search command.
1
2
3
4
5
6
7
8
C:\dev\vcpkg>vcpkg search sdl2
ffmpeg[sdl2]                              Sdl2 support
hello-imgui[sdl2-binding]                 Use SDL2 platform backend
imgui[sdl2-binding]                       Make available SDL2 binding
imgui[sdl2-renderer-binding]              Make available SDL2 Renderer binding
libtcod[sdl]                              Support for SDL2 windows and events with the libtcod context.
magnum[sdl2application]                   Sdl2Application library
sdl2                     2.30.0           Simple DirectMedia Layer is a cross-platform development library designed ...
Once you have found the package you want to install, you can use the vcpkg install command to install it.
1
C:\dev\vcpkg>vcpkg install sdl2
After installing the package, you need create some files needed by vcpgk to integrate the package in your project. You can do this by running the vcpkg integrate install command.
1
C:\dev\hello-world>vcpkg new --application
This will create a manifest file vcpkg.json and a vcpkg.cmake file in your project directory. The vcpkg.json file contains the list of dependencies for your project, and the vcpkg.cmake file contains the CMake configuration for the vcpkg integration.
Next, add the SDL2 dependency.
1
C:\dev\hello-world>vcpkg add port sdl2
Then you need to add the SDL2 dependency to your CMakeLists.txt file.
1
2
3
4
5
6
7
8
9
cmake_minimum_required(VERSION 3.20)

project(hello-world)

find_package(SDL2 REQUIRED)

include_directories(${SDL2_INCLUDE_DIRS})
add_executable(hello-world main.cpp)
target_link_libraries(hello-world ${SDL2_LIBRARIES})
Finally here’s a simple example of how to use the SDL2 library in your project.
1
2
3
4
5
6
7
8
9
10
11
12
13
14
15
16
17
18
19
20
21
22
23
24
25
26
27
28
29
30
31
32
33
34
35
36
37
38
#include <iostream>
#include <SDL2/SDL.h>

#undef main

int main() {
    if (SDL_Init(SDL_INIT_VIDEO) != 0) {
        std::cerr << "SDL_Init Error: " << SDL_GetError() << std::endl;
        return 1;
    }

    SDL_Window *win = SDL_CreateWindow("Hello World!", 100, 100, 640, 480, SDL_WINDOW_SHOWN);
    if (win == nullptr) {
        std::cerr << "SDL_CreateWindow Error: " << SDL_GetError() << std::endl;
        SDL_Quit();
        return 1;
    }

    SDL_Renderer *ren = SDL_CreateRenderer(win, -1, SDL_RENDERER_ACCELERATED | SDL_RENDERER_PRESENTVSYNC);
    if (ren == nullptr) {
        SDL_DestroyWindow(win);
        std::cerr << "SDL_CreateRenderer Error: " << SDL_GetError() << std::endl;
        SDL_Quit();
        return 1;
    }

    for (int i = 0; i < 3; ++i) {
        SDL_RenderClear(ren);
        SDL_RenderPresent(ren);
        SDL_Delay(1000);
    }

    SDL_DestroyRenderer(ren);
    SDL_DestroyWindow(win);
    SDL_Quit();

    return 0;
}
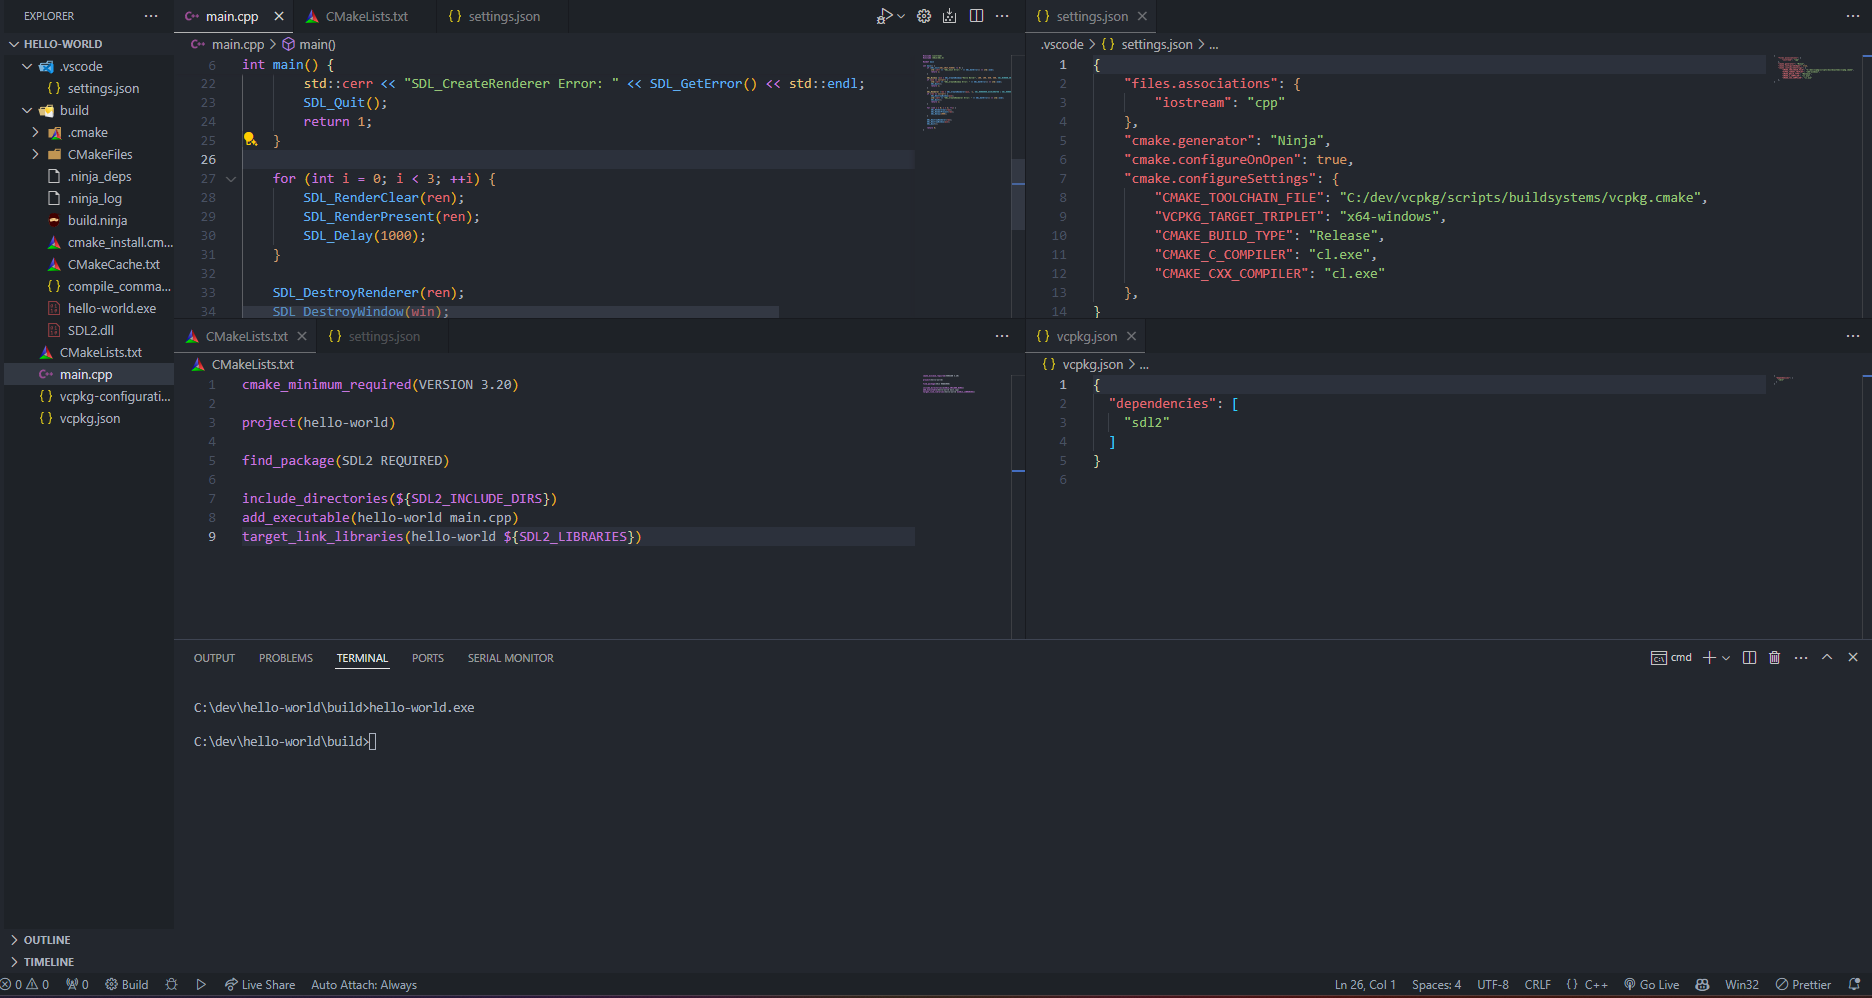
If everything went well, you should be able to build and run your project with the SDL2 library using the CMake Tools extension in Visual Studio Code 👍